Wednesday, February 14, 2007

Converting XML to XSLT VS.

XML XSLT Converter

This article is away shows you how to convert from xml to Excel vise versa and here the code shows that:
1- Conversion from XML to Xslt:
There are two ways to do that one using workbook method, this way is long as you must create each cell and its layout and name each cell by the data you want which is not dynamic to export data into Excel way, and the second method which I use here is using xml document and xml path document and XslTransform this all just create the excel file as output containing any number of cells dynamically you must not to create each cell alone.

Using the code:
using System.IO;
using System.Xml.Xsl;
using System.Xml.XPath;

private void createXML_ConverXSL()
{

Excel_file="Excel.xsl"; //contains schema
XslTransform xsl=new XslTransform();
xsl.Load(Excel_file);
XPathDocument doc = new XPathDocument("xmlfile.xml");
Stream strmTemp = new FileStream("Outputfile.xls",FileMode.OpenOrCreate);
xsl.Transform(doc, null, strmTemp, null);
strmTemp.Close();
}
This all the code you will write to convert from any xml file to Excel file and the file "Excel.xsl" here:
Just open new notepad copy and past the next schema and name it excel.xsl or any name and use it in xsl.load("name.xsl"):
The schema:

2- Converting from XSLT to XML
The code below shows you how to read xsl sheet and convert it to xml document
Using the code:
OleDbConnection oleDBCon = new OleDbConnection("Provider=Microsoft.Jet.OLEDB.4.0;" +
"Data Source=" + (strxlsFileName) + ";" +
"Extended Properties=Excel 8.0;");
oleDBCon.Open();
DataTable dt = new DataTable();
dt = oleDBCon.GetOleDbSchemaTable(OleDbSchemaGuid.Tables, null);
if(dt != null)
{
String[] excelSheets = new String[dt.Rows.Count];
// Add the sheet name to the string array.
cboSheetnames.Items.Clear();
foreach(DataRow row in dt.Rows)
{
string strSheetTableName = row["TABLE_NAME"].ToString();
System.Web.UI.WebControls.ListItem item = new System.Web.UI.WebControls.ListItem();
item.Value=strSheetTableName;
item.Text=strSheetTableName.Substring(0,strSheetTableName.Length-1);
cboSheetnames.Items.Add(item);
}
cboSheetnames.SelectedIndex=0;
}
oleDBCon.Close();

Note this way reads all the sheets in the one excel file so I use a combo box to show all the sheets and you can choose any of them and there is another function getting every sheet in data set as follow:

DataSet ds_excel= new DataSet();
ds_excel.Clear();
oleDBCon = new OleDbConnection("Provider=Microsoft.Jet.OLEDB.4.0;" +
"Data Source=" + (strxlsFileName) + ";" +
"Extended Properties=Excel 8.0;");
oleDBCon.Open();
OleDbDataAdapter objAdapter1 = new OleDbDataAdapter("SELECT * FROM ["+strSheetName+"$]",oleDBCon);
objAdapter1.SelectCommand.ExecuteNonQuery();
objAdapter1.Fill(ds_excel);
dataGrid1.DataSource = ds_excel.Tables[0].DefaultView;
oleDBCon.Close();
ds.WriteXml("filename");

You can put this code in a button function and when you choose the sheet from the combo and click the button the previous function executed and filling the data set.

Conclusion:
The first point shows you how to convert from xml to xsl in speed and easy and codeless way this a dynamic than you create each cell and then pass data to it, this way general for any number of cells.
And the second point shows how to convert it back again from xsl to xml document even it contains may sheets in the same file.

Tuesday, January 23, 2007

Command Editor

Command Editor

Command editor is a program calling one process and excute any parameters may be passed to it, so mainly my work and my example here is cmd.exe .

How it is work?
Many times you need to open command prompet to do some operation on it i.e dir, del, ping, ...etc.
Here you can just write command in the first textbox i.e ( cmd.exe ), and write the operaation you need to do and click start or just press enter from key borad the command you typed will be excuted and the result will be printed on the text area in the right side beside the status in the
status text area.
- You can browse any file you want exe file specially those which console application like any consol application takes parameters.
- You can also type the command in the text area and press enter it will be excuted.
- Also you can save the result from in text format by click save log button.

Sample Code:

private void excute(string command, string argument)
{
p = new Process();
p.StartInfo.FileName =command;
p.StartInfo.UseShellExecute = false;
p.StartInfo.RedirectStandardOutput = true;
p.StartInfo.RedirectStandardInput = true;
p.StartInfo.RedirectStandardError = true;
p.StartInfo.CreateNoWindow = true;
p.Start();
myStreamReader = p.StandardOutput;
myStreamReader2 = p.StandardError;
p.StandardInput.Write(paramater);
p.StandardInput.WriteLine();
p.StandardInput.Close();
.
.
.
.
}
and for key press

if(e.KeyValue==13)//enter
{
s=txt_result.Text.Substring(i+1).ToString();
excute(txt_command.Text,s.Substring(0,s.Length));
s=null;
}
This all done.
Osama Gamal 2007

Thursday, January 11, 2007

ODBC Connection Maker


ODBC Connection Maker

The article shows how to implement odbc connection which is done using odbc connection wizard in the administrative tools in the control panel .

What are you need to make a connection?
Data source,
Description,
Server address,
Username and password in case of SQL server authentication,
Database name.

After you give the connection these parameters you can ready to test you connection. This exactly what I done here in this application.
There are more than away you can implement this one of them is the using of odbccp32.dll and the other which using the system registry.

The first thing the connection is need is to create the odbc connection in the system registry under the following path: HKEY_LOCAL_MACHINE\SOFTWARE\ODBC\ODBC.INI
and put the data base under this: HKEY_LOCAL_MACHINE\SOFTWARE\ODBC\ODBC.INI\ODBC Data Sources

what I done is writing the previous values in the system registry my self like

RegistryKey regKey = Registry.LocalMachine.CreateSubKey("SoFTWARE\\ODBC\\ODBC.INI\\"+dsource);
regKey.SetValue("Description",descr);

and when read the data from the registery I loop for all the odbc.ini items and return then in the list view this can be like this:

Registry.LocalMachine.OpenSubKey("SOFTWARE\\ODBC\\ODBC.INI\\"+s1[i]).GetValueNames();

item.SubItems.Add( Registry.LocalMachine.OpenSubKey("SOFTWARE\\ODBC\\ODBC.INI\\"+s1[i]).GetValue("Description").ToString());

listView2.Items.Add(item);


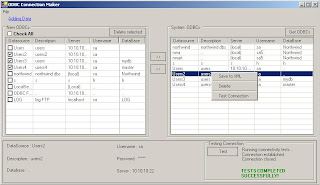
The applcation contains two list views one for reading the data of the wanted odbcs to be created and one for the added odbcs and already existing odbcs which is loaded from registry.
The first list view is loading an xml file which is contained by odbcs and also you create new odbc and it will be added to xml automatically:
When you want to add odbc to the listview2 just select needed items and click add button or drag and drop item on the list view.
As if the connection already exist it will not be added any more.

Also you can delete unwanted odbc after you add it by selecting it and click delete selected button this will delete from the first list view and delete from the xml.

On the other hand if you already added an odbc to the second listview it will be added to the system so if you want to delete it just click it and click the button delete<<>

For reading and loading the needed data from the xml and from the system:

private void Form1_Load(object sender, System.EventArgs e)
{

read_xml();
read_registery();
listView2.Items[0].Selected=true;

listView2_Click_1(null,null);button1.Enabled=false;
//testing_groupbox.Enabled=false;
}


And this for creating the connection:

private void btn_create_Click(object sender, System.EventArgs e)
{
//string dsn = "MyDSNName";
//InitializeConnection(dsn);
try
{
for(int i=0;i {
if(listView1.Items[i].Checked==true)
{
foreach(ListViewItem itm in listView2.Items)
{
if((listView2.Items[itm.Index].SubItems[0].Text)==(listView1.Items[i].SubItems[0].Text))
{
listView1.Items[i].Checked=false;
MessageBox.Show(listView1.Items[i].SubItems[0].Text+" Data Source is already registered","Exist Data",MessageBoxButtons.OK,MessageBoxIcon.Warning);
b=true;
break;
}
}
if(b==true)
{
b=false;
continue;
}
else
{
datasource=listView1.Items[i].SubItems[0].Text;
item=new ListViewItem(datasource);
description=listView1.Items[i].SubItems[1].Text;
item.SubItems.Add(description);
server=listView1.Items[i].SubItems[2].Text;
item.SubItems.Add(server);
username=listView1.Items[i].SubItems[3].Text;
item.SubItems.Add(username);
password=listView1.Items[i].SubItems[4].Text;
item.SubItems.Add(password);
database=listView1.Items[i].SubItems[5].Text;
item.SubItems.Add(database);

listView2.Items.Add(item);

create_connection(datasource,description,server,username,password,database);
// listView2.Items.Clear();
// read_registery();
}
listView1.Items[i].Checked=false;
}
}
}
catch{}

}
This the drag over and drag drop functions
private void listView2_DragOver(object sender, System.Windows.Forms.DragEventArgs e)
{
if (!e.Data.GetDataPresent(DataFormats.FileDrop))
{
e.Effect = DragDropEffects.None;
return;
}

if ((e.AllowedEffect & DragDropEffects.Move) == DragDropEffects.Move)
{
// By default, the drop action should be move, if allowed.
e.Effect = DragDropEffects.Move;
string[] files = (string[])e.Data.GetData(DataFormats.FileDrop);
}
else
e.Effect = DragDropEffects.None;

// This is an example of how to get the item under the mouse
Point pt = listView2.PointToClient(new Point(e.X, e.Y));
ListViewItem itemUnder = listView2.GetItemAt(pt.X, pt.Y);
}
private void listView2_DragDrop(object sender, System.Windows.Forms.DragEventArgs e)
{
if (!e.Data.GetDataPresent(DataFormats.FileDrop))
{
return;
}
foreach(ListViewItem itm in listView2.Items)
{
if((listView2.Items[itm.Index].SubItems[0].Text)==f[0])
{
MessageBox.Show(f[0]+" Data Source is already registered","Exist Data",MessageBoxButtons.OK,MessageBoxIcon.Warning);
return;
}
}

listView2.Items.Add(new ListViewItem(f));
create_connection(f[0],f[1],f[2],f[3],f[4],f[5]);
//set_description();
}

Osama's resume

Osama Gamal Mahmoud

Cellular: (+20)10 168 3617

E-mail: osama_harb@hotmail.com

Address: 13 Naser st. from Hamed Nafea st. Maadi – Cairo – Egypt

You an review my complete resume at: http://osamacv.blogspot.com