
ODBC Connection Maker
The article shows how to implement odbc connection which is done using odbc connection wizard in the administrative tools in the control panel .
What are you need to make a connection?
Data source,
Description,
Server address,
Username and password in case of SQL server authentication,
Database name.
After you give the connection these parameters you can ready to test you connection. This exactly what I done here in this application.
There are more than away you can implement this one of them is the using of odbccp32.dll and the other which using the system registry.
The first thing the connection is need is to create the odbc connection in the system registry under the following path: HKEY_LOCAL_MACHINE\SOFTWARE\ODBC\ODBC.INI
and put the data base under this: HKEY_LOCAL_MACHINE\SOFTWARE\ODBC\ODBC.INI\ODBC Data Sources
what I done is writing the previous values in the system registry my self like
RegistryKey regKey = Registry.LocalMachine.CreateSubKey("SoFTWARE\\ODBC\\ODBC.INI\\"+dsource);
regKey.SetValue("Description",descr);
and when read the data from the registery I loop for all the odbc.ini items and return then in the list view this can be like this:
Registry.LocalMachine.OpenSubKey("SOFTWARE\\ODBC\\ODBC.INI\\"+s1[i]).GetValueNames();
item.SubItems.Add( Registry.LocalMachine.OpenSubKey("SOFTWARE\\ODBC\\ODBC.INI\\"+s1[i]).GetValue("Description").ToString());
listView2.Items.Add(item);
The applcation contains two list views one for reading the data of the wanted odbcs to be created and one for the added odbcs and already existing odbcs which is loaded from registry.
The first list view is loading an xml file which is contained by odbcs and also you create new odbc and it will be added to xml automatically:
 When you want to add odbc to the listview2 just select needed items and click add button or drag and drop item on the list view.
As if the connection already exist it will not be added any more.
Also you can delete unwanted odbc after you add it by selecting it and click delete selected button this will delete from the first list view and delete from the xml.
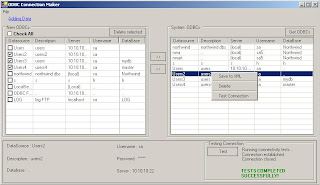 On the other hand if you already added an odbc to the second listview it will be added to the system so if you want to delete it just click it and click the button delete<<>
private void Form1_Load(object sender, System.EventArgs e)
{
read_xml();
read_registery();
listView2.Items[0].Selected=true;
listView2_Click_1(null,null);button1.Enabled=false;
//testing_groupbox.Enabled=false;
}
The article shows how to implement odbc connection which is done using odbc connection wizard in the administrative tools in the control panel .
What are you need to make a connection?
Data source,
Description,
Server address,
Username and password in case of SQL server authentication,
Database name.
After you give the connection these parameters you can ready to test you connection. This exactly what I done here in this application.
There are more than away you can implement this one of them is the using of odbccp32.dll and the other which using the system registry.
The first thing the connection is need is to create the odbc connection in the system registry under the following path: HKEY_LOCAL_MACHINE\SOFTWARE\ODBC\ODBC.INI
and put the data base under this: HKEY_LOCAL_MACHINE\SOFTWARE\ODBC\ODBC.INI\ODBC Data Sources
what I done is writing the previous values in the system registry my self like
RegistryKey regKey = Registry.LocalMachine.CreateSubKey("SoFTWARE\\ODBC\\ODBC.INI\\"+dsource);
regKey.SetValue("Description",descr);
and when read the data from the registery I loop for all the odbc.ini items and return then in the list view this can be like this:
Registry.LocalMachine.OpenSubKey("SOFTWARE\\ODBC\\ODBC.INI\\"+s1[i]).GetValueNames();
item.SubItems.Add( Registry.LocalMachine.OpenSubKey("SOFTWARE\\ODBC\\ODBC.INI\\"+s1[i]).GetValue("Description").ToString());
listView2.Items.Add(item);
The applcation contains two list views one for reading the data of the wanted odbcs to be created and one for the added odbcs and already existing odbcs which is loaded from registry.
The first list view is loading an xml file which is contained by odbcs and also you create new odbc and it will be added to xml automatically:
 When you want to add odbc to the listview2 just select needed items and click add button or drag and drop item on the list view.
As if the connection already exist it will not be added any more.
Also you can delete unwanted odbc after you add it by selecting it and click delete selected button this will delete from the first list view and delete from the xml.
 On the other hand if you already added an odbc to the second listview it will be added to the system so if you want to delete it just click it and click the button delete<<>
For reading and loading the needed data from the xml and from the system:
private void Form1_Load(object sender, System.EventArgs e)
{
read_xml();
read_registery();
listView2.Items[0].Selected=true;
listView2_Click_1(null,null);button1.Enabled=false;
//testing_groupbox.Enabled=false;
}
And this for creating the connection:
private void btn_create_Click(object sender, System.EventArgs e)
{
//string dsn = "MyDSNName";
//InitializeConnection(dsn);
try
{
for(int i=0;i
if(listView1.Items[i].Checked==true)
{
foreach(ListViewItem itm in listView2.Items)
{
if((listView2.Items[itm.Index].SubItems[0].Text)==(listView1.Items[i].SubItems[0].Text))
{
listView1.Items[i].Checked=false;
MessageBox.Show(listView1.Items[i].SubItems[0].Text+" Data Source is already registered","Exist Data",MessageBoxButtons.OK,MessageBoxIcon.Warning);
b=true;
break;
}
}
if(b==true)
{
b=false;
continue;
}
else
{
datasource=listView1.Items[i].SubItems[0].Text;
item=new ListViewItem(datasource);
description=listView1.Items[i].SubItems[1].Text;
item.SubItems.Add(description);
server=listView1.Items[i].SubItems[2].Text;
item.SubItems.Add(server);
username=listView1.Items[i].SubItems[3].Text;
item.SubItems.Add(username);
password=listView1.Items[i].SubItems[4].Text;
item.SubItems.Add(password);
database=listView1.Items[i].SubItems[5].Text;
item.SubItems.Add(database);
listView2.Items.Add(item);
create_connection(datasource,description,server,username,password,database);
// listView2.Items.Clear();
// read_registery();
}
listView1.Items[i].Checked=false;
}
}
}
catch{}
}
This the drag over and drag drop functions
private void listView2_DragOver(object sender, System.Windows.Forms.DragEventArgs e)
{
if (!e.Data.GetDataPresent(DataFormats.FileDrop))
{
e.Effect = DragDropEffects.None;
return;
}
if ((e.AllowedEffect & DragDropEffects.Move) == DragDropEffects.Move)
{
// By default, the drop action should be move, if allowed.
e.Effect = DragDropEffects.Move;
string[] files = (string[])e.Data.GetData(DataFormats.FileDrop);
}
else
e.Effect = DragDropEffects.None;
// This is an example of how to get the item under the mouse
Point pt = listView2.PointToClient(new Point(e.X, e.Y));
ListViewItem itemUnder = listView2.GetItemAt(pt.X, pt.Y);
}
private void listView2_DragDrop(object sender, System.Windows.Forms.DragEventArgs e)
{
if (!e.Data.GetDataPresent(DataFormats.FileDrop))
{
return;
}
foreach(ListViewItem itm in listView2.Items)
{
if((listView2.Items[itm.Index].SubItems[0].Text)==f[0])
{
MessageBox.Show(f[0]+" Data Source is already registered","Exist Data",MessageBoxButtons.OK,MessageBoxIcon.Warning);
return;
}
}
listView2.Items.Add(new ListViewItem(f));
create_connection(f[0],f[1],f[2],f[3],f[4],f[5]);
//set_description();
}


1 comment:
Great work.
Post a Comment